 Introduction
Get started
Basics
Sampler
Synthesizer
Sample Store
Projects
Troubleshooting
AUv3
Credits
Sampler
Overview
Click on the sample plot in the Main View to open the Sampler (see Basics 8).
Each Pad is a Sampler by default, meaning it can load up to 40 second long samples and play them in parts or entirely. You can also add fade-in and fade-out regions or slice the sample into multiple parts. Since version 2.0 there is also a simple yet effective sample editor on board (see 1.3).
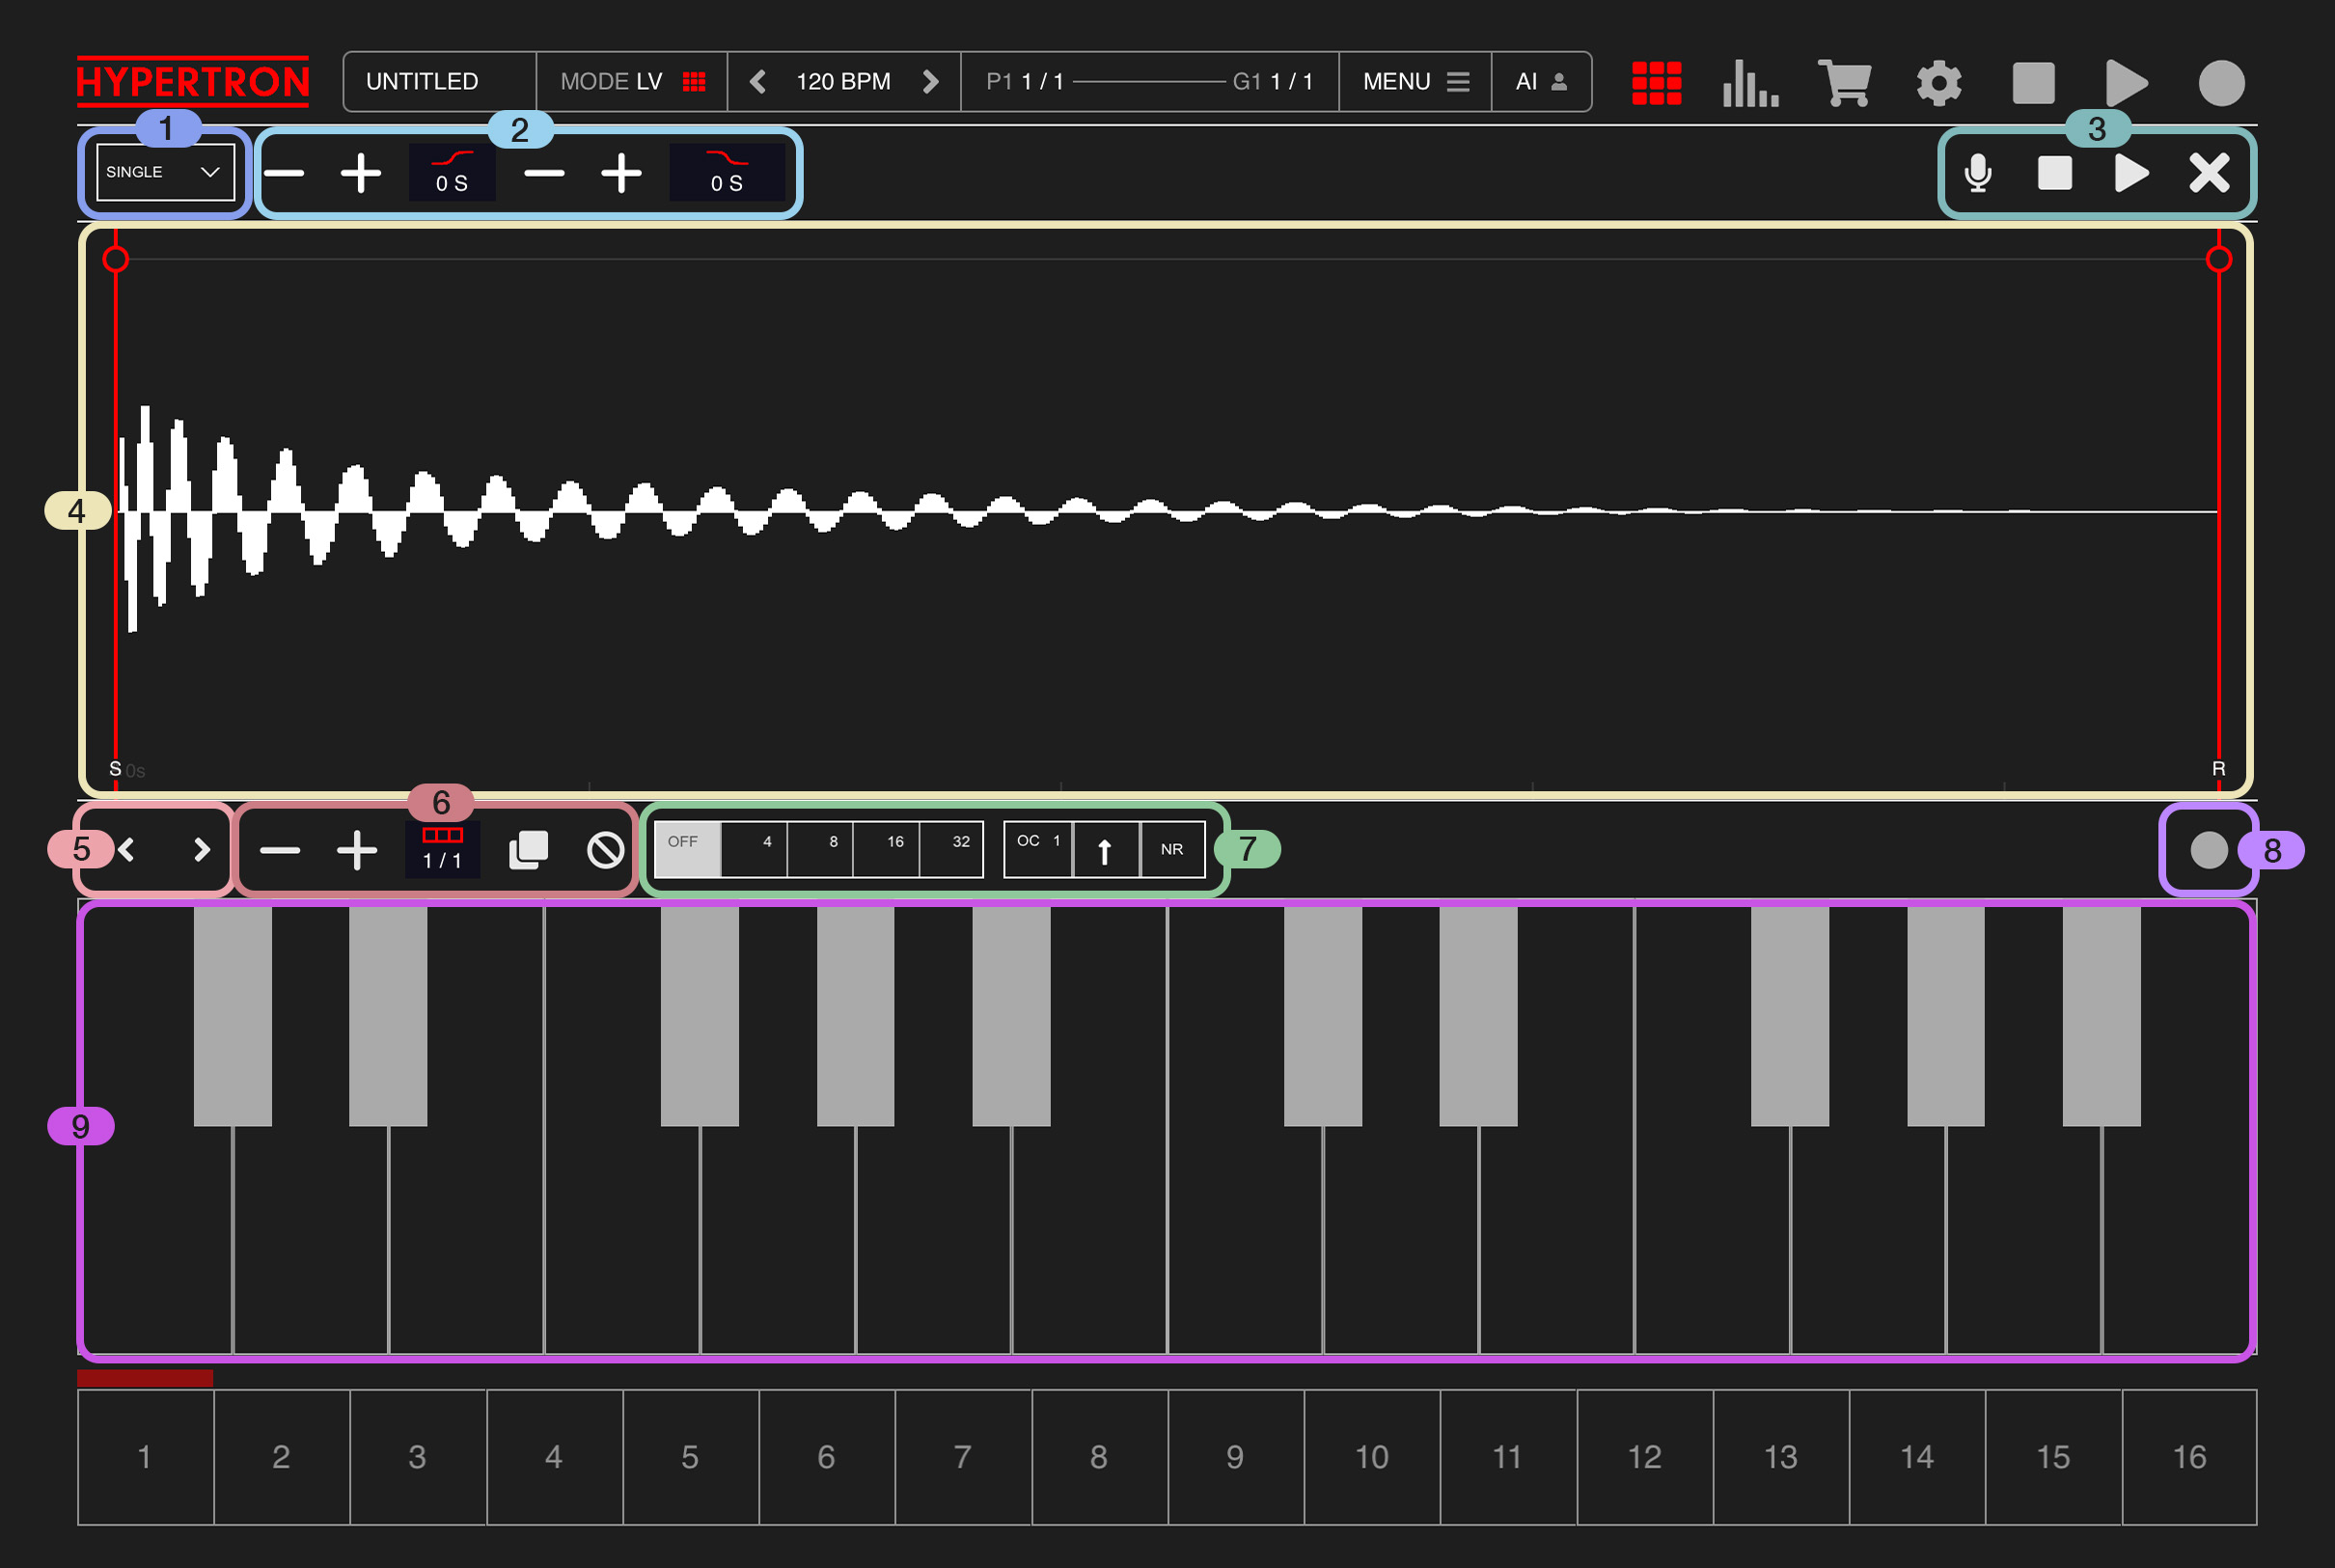
1Modes
1
On the left you'll find a dropdown menu. When you press on it, it will show three different modes:

This is the single shot sampler mode, which lets you trim the sample of your current Pad using the two red lines on the left and right in the Editor View (see 4). The red circles at the top of these lines adjust the fade-in and fade-out regions. Simply press a line or circle and slide horizontally to modify the regions. A red dot appears when this mode is selected.
1.1.SINGLE
( Default mode )This is the single shot sampler mode, which lets you trim the sample of your current Pad using the two red lines on the left and right in the Editor View (see 4). The red circles at the top of these lines adjust the fade-in and fade-out regions. Simply press a line or circle and slide horizontally to modify the regions. A red dot appears when this mode is selected.
1.2.MULTI
When you select this mode, multi-slice mode will be activated and the corresponding toolbar will be shown (see 2.2). The Editor View (see 4) will enable you to slice the sample into multiple parts by simply taping on it. Displays a red dot when this mode is selected.1.3.EDIT
Choosing this option will show a Sample Editor. Inside the Sample Editor your can alter your sample by using the available tools shown in the toolbar (see 2.3). Opening the Sample Editor will not change the sampler mode selected in 1.1 or 1.2.2Toolbars
2
Depending on which Sampler mode has been selected in 1 there are 3 different toolbars:


DUPLICATE
Duplicates the current region or entire sample.
TRIM
Trims the current region.
REMOVE
Removes the current region.
SILENCE
Silences the current region or entire sample.
REVERSE
Reverses the current region or entire sample.
NORMALIZE
Normalizes the current region or entire sample, meaning it will detect the loudest peak of the waveform and adjust the volume accordingly for maximum gain output.
PITCH
Pitches the current region or entire sample up and down using the prompted value.
TIMESTRETCH
Timestretches the current region or entire sample by the prompted multiplication factor.
2.1.SINGLE
These tools are available in SINGLE mode, from left to right:2.1.1.FADE-IN
With this controls you can increase or decrease the Fade-In region of the sample.2.1.2.FADE-OUT
With this controls you can increase or decrease the Fade-Out region of the sample.2.2.MULTI
The following tools will be listed in Mulit-Slice mode from left to right:2.2.1.NAVIGATION MODE
Tap on the HAND Icon to easily navigate through the Waveform inside the Editor View. Use two fingers to zoom into the waveform or use two fingers to scroll horizontally through the sample.2.2.2.SLICING MODE
Tap on the CURSOR icon to easily add more Slices by tapping the sample inside the Editor View. Press on an existing Slice ( red line ) and slide horziontally to adjust the position of the Slice. Each slice you create will automatically be mapped to the Keyboard (9)2.2.3.TRASH
When you tap this button, the selected slice will be removed.2.2.3.RESET
When you tap this button, the first slice will be reset and all other slices will be removed.2.3.EDIT
The following tools will be listed in the Sample Editor from left to right:2.3.1.NAVIGATION MODE
Tap the HAND Icon to easily navigate through the Waveform inside the Editor View. Use two fingers to zoom into the waveform or use two fingers to scroll horizontally through the sample.2.3.2.SELECTION MODE
Tap the CURSOR icon to easily select a region inside the waveform by pressing and sliding inside the Editor View (4). Once you have created a region, you can use the TOOLS (2.3.3) to alter that region. You can also tap the Editor View to deselect the region if you want to apply the tools to the entire sample.2.3.3.RESET
Reset all changes made in the Sample Editor and jump back to the original sample ( or the last saved version of this sample ).2.3.3.IMPORT
Tap here to either a) import a sample from the Files app by appending it at the end of the current sample ( MERGE ), or b) replacing the current sample completely ( REPLACE ).2.3.4.SAVE
Tap here to save your sample as WAV file into the internal sample library. All changes made in the Sample Editor will be included as well.2.3.5.TOOLS
Press this dropdown menu to apply one of the following effects to the entire region or just the selected region (see 2.3.2):DUPLICATE
Duplicates the current region or entire sample.
TRIM
Trims the current region.
REMOVE
Removes the current region.
SILENCE
Silences the current region or entire sample.
REVERSE
Reverses the current region or entire sample.
NORMALIZE
Normalizes the current region or entire sample, meaning it will detect the loudest peak of the waveform and adjust the volume accordingly for maximum gain output.
PITCH
Pitches the current region or entire sample up and down using the prompted value.
TIMESTRETCH
Timestretches the current region or entire sample by the prompted multiplication factor.
3Tools
3
Here you will find the following buttons from left to right:

The Metronome and its settings influence recording behavior as follows:
If Hypertron is stopped and the Metronome is active with the Metronome Count-In setting enabled, four ticks will play before the track starts and recording begins.
If Hypertron is stopped and the Metronome is active while the Metronome Count-In setting is disabled, the track will start and recording will begin immediately.
If Hypertron is stopped and the Metronome is disabled, recording will start without starting the sequencer. This might be handy if you just want to sample a source in silence.
3.1.Microphone
Tap here to start recording. If no interface is connected, recording will use the built-in microphone. When Hypertron is playing, recording will begin as soon as the next loop cycle begins. In the meantime, a waiting screen is shown, displaying the current bar and the total bar length of the selected Pad. This gives you time to prepare your recording. Once recording is active, simply tap on the screen to end recording, otherwise it will automatically end the recording at the end of the loop.The Metronome and its settings influence recording behavior as follows:
If Hypertron is stopped and the Metronome is active with the Metronome Count-In setting enabled, four ticks will play before the track starts and recording begins.
If Hypertron is stopped and the Metronome is active while the Metronome Count-In setting is disabled, the track will start and recording will begin immediately.
If Hypertron is stopped and the Metronome is disabled, recording will start without starting the sequencer. This might be handy if you just want to sample a source in silence.
3.2.Stop
Tap this button to stop the sample.3.3.Play
Tap this button to play the sample.3.4.Close
Tap this button to close the Sampler.4Editor View
4
Depending on which Sampler mode (see 1) has been selected there are 3 different toolbars. The functionality of the Editor View changes accordingly (see 2).
5Octave Control
5

Use these two buttons to increase or decrease the current octave of the Keyboard in a total range of 4 octaves. The current octave will be stored specifically for this Pad and will be indicated by a highlighted background.
6Bar Control
6

Use these controls to change the Bar length of the selected Pad as discussed in Editor Bar Length. There is also a RESET button at the right side of this section, which resets and erases the complete pattern of the selected Pad, without changing the bar length.
7Note Repeat & Arpeggiator
7
These two controls let you control the Pads Note Repeat and Arpeggiator capabilites.

DOWN
The arpeggiator goes down.
UP
The arpeggiator goes up.
UPDOWN1
The arpeggiator goes up and down.
UPDOWN2
The arpeggiator goes up and down without repeating the tone inbetween direction change.
RANDOM
The arpeggiator picks random notes.
1. Note Repeat NR ( Default )
When active, the arpeggiator will only trigger the steps in the selected step interval. It will not overwrite existing step pitch. This is great if you want to keep a melody while changing the rythm or timing of that pattern. During record, all steps inbetween the selected step interval will be erased.
2. Arpeggiator ARP
When active, the arpeggiator will only trigger the steps in the selected step interval. In this mode, the arpeggiator will overwrite existing pitch. Works with multiple notes. Plays one note after another in the direction and with the amount of octaves, which have been set in the Arpeggiator Options (see 7.2) During record, all steps inbetween the selected step interval will be erased. Arpeggiator is synced to timeline.
3. LIVE
This arpeggiator will only trigger when either a finger presses the Note Repeat control in the Main View (see Basics 10.2) or if one or multiple notes are pressed on the Keyboard. It will overwrite pitch and also keep triggering existing steps inbetween the step interval. In this mode, the arpeggiator is synced to the start time of activation.
7.1.Note Repeat
This control offers four step intervals to choose from: 4th, 8th, 16th and 32nd. When you press and hold one of these step intervals, the arpeggiator will be activated, triggering steps in that interval. You can slide horizontally to change the desired interval on the fly.7.2.Arpeggiator Options
There are three dropdowns to control the Arpeggiator with:7.2.1.Octaves
Press the first dropdown menu to choose the amount of octaves, from 1 to 4 octaves.7.2.2.Direction
Press the second dropdown menu to choose one from the following directions:DOWN
The arpeggiator goes down.
UP
The arpeggiator goes up.
UPDOWN1
The arpeggiator goes up and down.
UPDOWN2
The arpeggiator goes up and down without repeating the tone inbetween direction change.
RANDOM
The arpeggiator picks random notes.
7.2.2.Arpeggiator Modes
Press on the third dropdown menu to choose one out of the following arpeggiator modes:1. Note Repeat NR ( Default )
When active, the arpeggiator will only trigger the steps in the selected step interval. It will not overwrite existing step pitch. This is great if you want to keep a melody while changing the rythm or timing of that pattern. During record, all steps inbetween the selected step interval will be erased.
2. Arpeggiator ARP
When active, the arpeggiator will only trigger the steps in the selected step interval. In this mode, the arpeggiator will overwrite existing pitch. Works with multiple notes. Plays one note after another in the direction and with the amount of octaves, which have been set in the Arpeggiator Options (see 7.2) During record, all steps inbetween the selected step interval will be erased. Arpeggiator is synced to timeline.
3. LIVE
This arpeggiator will only trigger when either a finger presses the Note Repeat control in the Main View (see Basics 10.2) or if one or multiple notes are pressed on the Keyboard. It will overwrite pitch and also keep triggering existing steps inbetween the step interval. In this mode, the arpeggiator is synced to the start time of activation.
8Record Button
8

Press this button, if you want to record a melody using the keyboard.
It is the same as enabling REC inside the Main View ( see 9.10.1 ).
9Keyboard
9
A simple onscreen keyboard for you to play and record your melodies.
Hypertron has a monophonic sampler and synthesizer, therefore only one key can be played at once. Multiple keys can be selected, when Noterepeat or Arpeggiator is enabled on this Pad, though (see 7).
Hypertron has a monophonic sampler and synthesizer, therefore only one key can be played at once. Multiple keys can be selected, when Noterepeat or Arpeggiator is enabled on this Pad, though (see 7).