 Introduction
Get started
Basics
Sampler
Synthesizer
Sample Store
Projects
Troubleshooting
AUv3
Credits
Menu
Overview
When you tap on MENU inside the Statusbar (see Basics 1.5), a popup view will appear with a list of tools and settings. Don't forget to scroll down inside the Menu in order to discover all available tools and options!
1.EDIT LAYOUT

This is the full menu:
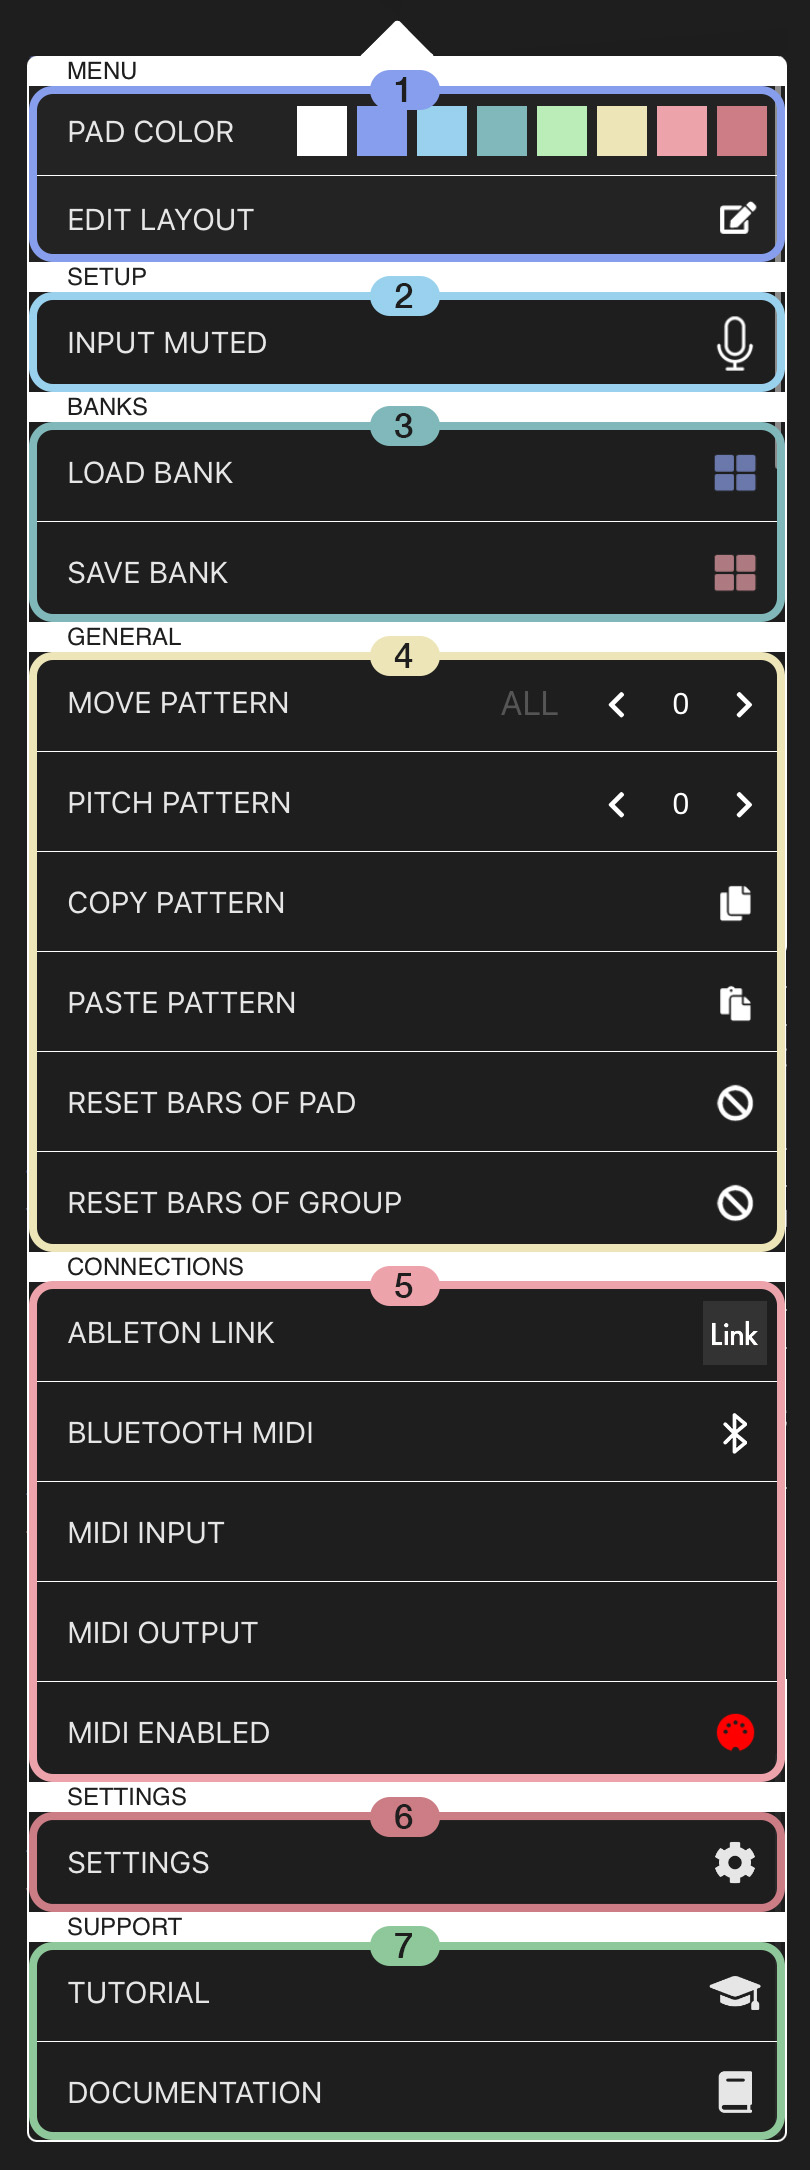
1Edit Layout
1
1.1.PAD COLOR
Here you find 8 colors to quickly assign to your selected Pad.1.2.EDIT LAYOUT
Tap this button to open a layout editor, where you can re-order Pads, Takes and Groups using drag and drop and easily assign colors to them as well. It is also possible to rename Pads as well.2Setup
2
INPUT TO SPEAKER / INPUT MUTED
Tap here to toggle the input source between muted and unmuted.
When it says INPUT TO SPEAKER it will output the microphone of your device or input source of your connected audio interface. You can define the input channels in MENU > SETTINGS (see 6.1.1).
When it says INPUT MUTED the internal microphone or other connected audio interface will be bypassed.
3Banks
3
This section lets you store and load your current Pads, samples, synthesizer settings, effects and effect settings as Banks, making it easy to prepare session templates for later recall or reuse. It will not save patterns, Takes or Groups.
3.1.LOAD BANK
Tap here to load a bank from a list of saved banks.3.2.SAVE BANK
Tap here to save the current Pads as a bank.4General Tools
4
Here are a handy set of features, easily accessible from anywhere in the Main View or Mixer:
4.1.MOVE PATTERN
Press the left or right arrows in this field to move the pattern of the current Pad by one step backward or forward. When ALL is enabled, tapping the arrows moves all patterns stored in every Take of all Pads within the current Group.4.2.PITCH PATTERN
Press the left or right arrows in this field to pitch the pattern of the selected Pad one semitone up and down.4.3.COPY PATTERN
Copies the pattern of the selected Pad into a buffer.4.4.PASTE PATTERN
Paste the pattern into the current Take of the selected Pad from the buffer.4.5.RESET BARS OF PAD
Resets all patterns of the current Pad, stored in every Take within the current Group, including all effect automations. This function also resets the bar length to one bar.4.5.RESET BARS OF PAD
Resets all patterns of the current Group, including all effect automations. This function also resets the bar lengths to one bar for each Pad.5Connections
5
5.1.ABLETON LINK
Tap this button to open the Ableton Link Settings. Ableton Link is a protocol, which lets you connect to other peers through WIFI and synchronizes tempo, as well as start and stop events.5.2.BLUETOOTH MIDI
Tap this button to open the Bluetooth MIDI Devices dialogue, allowing you to connect to external Bluetooth MIDI keyboards.5.3.MIDI INPUT
Tap this button to see a list of available MIDI input devices. Tap on a MIDI device to use as an input device. Useful if you want to connect USB MIDI keyboards.5.4.MIDI OUTPUT
Tap this button to display a list of available MIDI output devices. Select a device to use as the output. This is useful for connecting external synthesizers or other MIDI-compatible hardware. Individual Pads can be assigned to trigger external MIDI events by setting the MIDI OUTPUT CHANNEL in the Mixer Channel (see 3.2).5.5.MIDI ENABLED / MIDI DISABLED
Tap this button to enable or disable MIDI functionality entirely, including both MIDI input and MIDI output.6Settings
6
When you tap here you will get another sub-menu with the following settings:
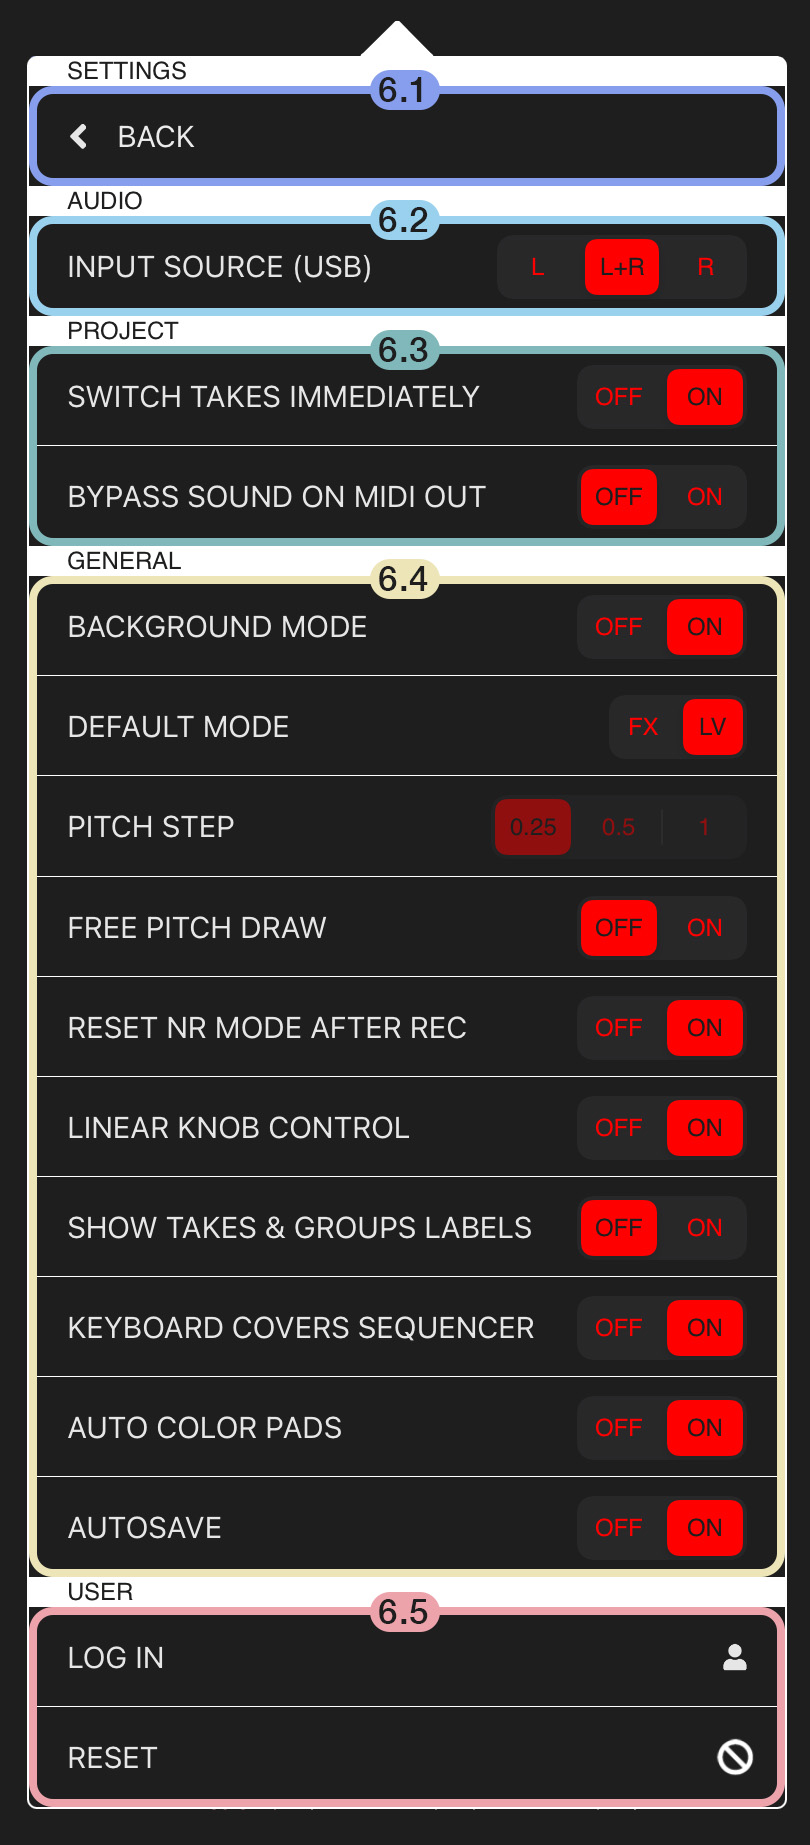
6.1.BACK
Click here to go back to the main menu.6.2.AUDIO
6.2.1.INPUT SOURCE (USB)
This setting lets you choose to either only use the left channel, the right channel or both channels ( stereo ) of your microphone or externally connected input device.6.3.PROJECT
6.3.1.SWITCH TAKES IMMEDIATELY
As discussed (see Basics 5), this setting defines the behavior when tapping / switching to a take. If enabled, Takes will switch immediately, if disabled, Takes will wait until the next loop before they switch. This setting needs to be set for each project seperately because users might want to have different behaviour for different projects.6.3.2.BYPASS SOUND ON MIDI OUT
When this option is enabled, and a MIDI OUT CHANNEL has been set on a Pad / channel inside the Mixer, the original sound of that Pad ( sample or synthesizer preset ) will not get triggered. This setting is useful, if you only want to hear the external gear.6.4.GENERAL
6.4.1.BACKGROUND MODE
When this option is enabled, the app continues to generate sound even when running in the background on iOS or iPadOS. When deactivated, the app stops playback when moved to the background on iOS or iPadOS, which reduces battery usage.6.4.2.DEFAULT MODE
This setting refers to the modes discussed in Basics 1.2 and defines, which of these two modes ( Live Mode LV or Effect Mode FX ) should be the default when re-opening the app or creating a new project.6.4.3.PITCH STEP
This setting defines the increment step size for the PITCH functionality inside the Quick Menu (see Basics 7.2). The value 1 is equal to one semitone.6.4.4.FREE PITCH DRAW
This setting defines a specific behavior in the Editor View (see Editor 6): when you press a step and slide horizontally, the same pitch value is applied to all other steps. Disable this setting if you want to freely draw individual steps across the piano roll.6.4.5.RESET NR MODE AFTER REC
When turned on, this setting will always reset the arpeggiator mode of the selected Pad inside the Keyboard view (see Sampler 7) from ARP or LIVE mode to NR after a recording.6.4.6.LINEAR KNOB CONTROL
When active, knobs in the synthesizer can be adjusted using vertical swipe gestures. When deactivated, the knobs behave like standard circular controls.6.4.7.SHOW TAKES & GROUPS LABELS
When active, there will be labels on top of Takes and Groups for better readability.6.4.8.KEYBOARD COVERS SEQUENCER
When enabled, a semi-transparent layer covers the step sequencer while the Keyboard is visible, preventing accidental inputs. When disabled, you can freely access the step sequencer even while Keyboard is visible (see Sampler 9).6.4.9.AUTO COLOR PADS
When enabled, Every Pad will automatically have a color assigned to it.6.4.10.AUTOSAVE
When enabled, Hypertron automatically saves your project every two minutes. This helps back up your ideas in case of unexpected events or crashes. When you reload the app or load a project and an autosave is found, you will be prompted to continue from the autosave. For reliable long-term work, projects should be saved manually under a specific filename.6.5.USER
6.5.1.LOG IN
Tap this button to log into your user account.6.5.2.RESET
Resets PRO and AUv3 status. If logged in, you will get logged out as well. Resets any user preferences.