
Basics
Overview
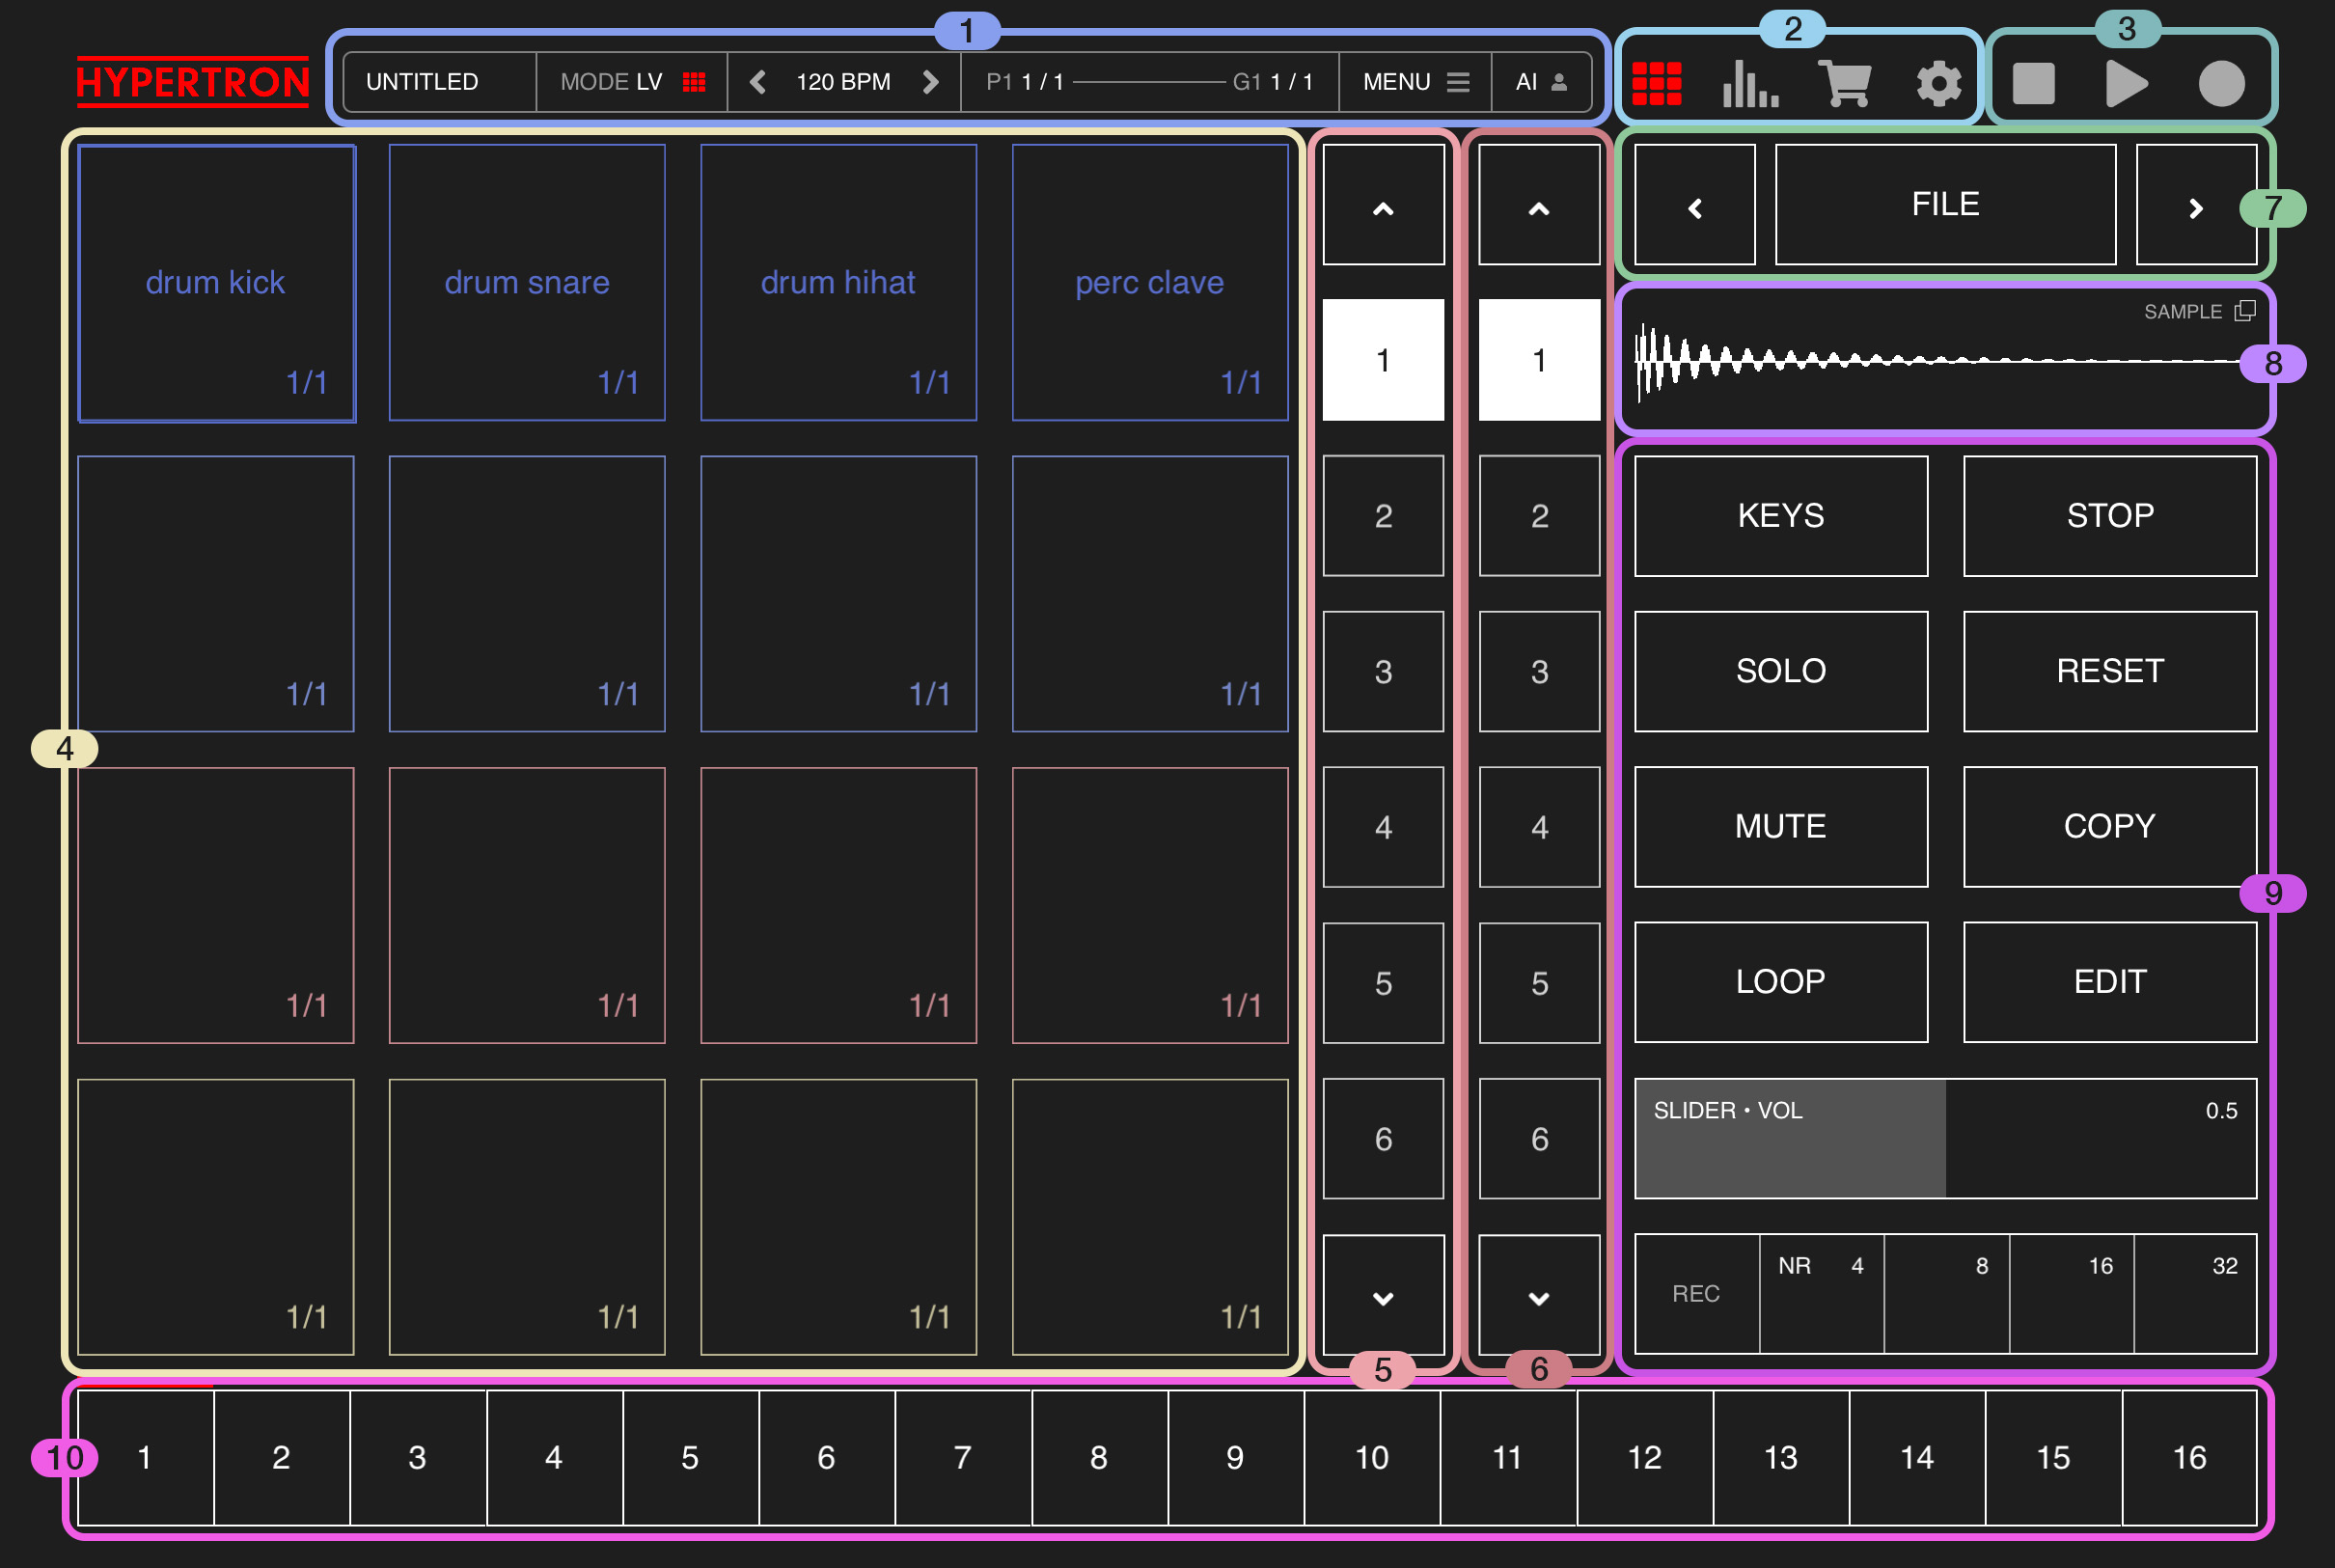
1.Statusbar
The Statusbar has the following elements from left to right:
1.1 Project Title
Shows the current project title. Tap this button in order to manually (quick-)save your project.
( If PRO IAP hasn't been purchased yet, it will show an "UPGRADE" button instead )
1.2. Mode
Shows the currently selected mode. Tap here to switch between Live Mode LV and Effects Mode FX, which defines the behaviour of the Pads:
1.2.1. Live mode:
In Live Mode, Pads get triggered by simply tapping on them. When REC is enabled and playback is active, steps in the step sequencer get recorded whenever Pads are triggered.
1.2.2. Effects mode:
In Effects mode, Pads can be selected silently and effects can be adjusted using swipe gestures:
Press on a Pad and slide horizontally to select an effect and slide vertically in order to adjust it. When REC is active, vertical swipe gesture movements on the Pad are recorded as effect automations. Make sure to watch this video to get started.
1.3. BPM View
Displays the current tempo of your project. Tap the arrow icons on the left and right to incrementally decrease or increase the tempo in integer steps. Tap the center to open the BPM View, where you can set a desired quantization value using the REC QUANT dropdown menu and adjust the tempo by either tapping BPM and typing in a value or tapping TAP a few times for automatic tempo detection. The Metronome can also be toggled on or off and offers a range of additional options. Inside the BPM View, you can also easily adjust the bar lengths of all Pads in the current Group at once.
1.4. Sequencer Bar
On the left side this area shows the current bar and bar length of the currently selected Pad.
On the right it displays the current bar and total bar length of your current Group.
When REC is enabled, this bar temporarily displays the complete sequencer pattern of the selected Pad in Effects Mode and the complete pattern of all Pads in Live Mode instead.
When REC is enabled, Button 5 and Button 6 inside the Sequencer Bar get temporarily replaced with UNDO and REDO buttons which let you go back and forth through the history of all steps / notes which you have added during record.
1.5. Menu
Tap on the button to open the Menu. A window will open, containing a list of certain functionalities and settings. Don't forget to scroll down inside the Menu in order to discover all available options!
1.6. AI
Tap this button to generate samples with AI.
You only need to register an online account once and will get free AI credits to generate samples inside the app. Alternatively you can also purchase the BUNDLE IAP, which gives you 20 AI Credits as well. Learn how to generate samples with AI watching this video.
2.Views
These buttons let you access the following views:
2.1 Main View
The main interface.
2.2 Mixer
A mixer where you can adjust volume for each Pad, manage effects as well as MIDI Out channels and access the masterbus channel.
2.3 Sample Store
A store where you can purchase and download free samples.
2.4 Projects Management
Here you can manage ( add, rename, duplicate, delete ) your projects as well as import and export projects. ( PRO IAP required )
3.Sequencer Controls
In this area you'll find two buttons for controlling the sequencer playback and one button for (live-) recording your project:
3.1. Stop
This button stops the sequencer and resets the playhead to the beginning of the track.
3.2. Play / Pause
This button starts the sequencer and toggles between PLAY and PAUSE.
3.3. Live Record and Export
Tap here to open the Export view, which enables you to live-record the masterbus and even every single track of your project as WAV ( available in PRO IAP ), with unlimited export time.
4.Pads
There are 16 pads on iPad or 12 Pads on iPhone and in the AUv3 extension. A Pad lets you trigger samples or synthesizer presets in real time in Live Mode. In Effects Mode, it can be used to silently select Pads, select and adjust effects or to automize effects using swipe gestures.
Watch this video to get started.
Each Pad shows the current bar and bar length at the bottom right corner. You can either adjust the bar length of all bars inside the BPM View or use the Editor to adjust the bar length for each Pad separately.
Watch this video to get started.
Each Pad shows the current bar and bar length at the bottom right corner. You can either adjust the bar length of all bars inside the BPM View or use the Editor to adjust the bar length for each Pad separately.
5.Takes
Each Pad has 16 Takes. A Take lets you store different melodic ideas and switch between them. All Takes of a Pad always have the same bar length automatically. A Take can be duplicated using drag and drop. In order to switch to a Take, simply tap on one. Use the arrow buttons at the top and bottom to navigate through all Takes.
If you want to switch the Takes automatically at the end of a loop, disable "SWITCH TAKES IMMEDIATELY" inside the Project Settings. This setting needs to be set for each project seperately because users might want to have different behaviour for different projects.
The color and order of Takes can also be adjusted in MENU > EDIT LAYOUT.
Learn more about Takes in this video.
6.Groups
Each project has 16 Groups. A Group stores individual patterns, bars, takes, mute states and effect automations for each Pad. Groups can be copied using drag and drop. In order to switch to another Group, simply tap on one. When playback is paused, the change will occur immediately, otherwise it will wait until the longest bar of your current Group has finished its cycle.
Use the arrow buttons at the top and bottom to navigate through all Groups.
Learn more about Groups in this video.
Use the arrow buttons at the top and bottom to navigate through all Groups.
Learn more about Groups in this video.
7.Quick Menu
On the right side you have simple menu with a list of settings, which are all related to the selected Pad. Simply navigate through this list using the arrow buttons at the left and right. Once you have arrived at a setting that you would like to change, tap the button in the middle. In most cases you can use the arrows to change the value. Tap on the button in the middle one more time to go back.
7.1 FILE
Opens the filebrowser. Inside the filebrowser you see a list of samples.
You can preview a sample by clicking on the PLAY icon on the left side, next to the sample / filename. In order to load a sample, simply click on the filename. In order to load a Synthesizer preset instead, tap on "SYNTH" at the top of the filebrowser, you will see a list of stock presets. You can also use drag and drop to assign a sample or synthesizer preset to a Pad: Simply press and hold a filename, until a white rectangle appears, then drag it onto a Pad and release your finger.
Tap the PIN icon in order to prevent the filebrowser from closing after a sample or synthesizer preset has been assigned. This feature is helpful if you want to assign multiple sounds to multiple Pads without having to re-open the filebrowser again.
You can also import samples by clicking on the IMPORT Icon. It is possible to import 40 second long audio from WAV, MP3 and even MP4 video files. ( requires PRO IAP )
Samples can be exported by pressing on a filename and sliding left until a submenu appears. Simply tap on EXPORT and follow the instructions. ( Requiires PRO IAP / doesn't work with pre-installed samples )
Samples can also be deleted by pressing on a filename and then sliding to the left. A submenu will appear. Simply click on DELETE and follow the instructions. ( doesn't work with pre-installed samples )
7.2 PITCH
This one lets you easily change the pitch of your sample or synthesizer even during playback.
There is a setting in MENU > SETTINGS called "PITCH STEP" which allows you to change the increment step size measured in half tones as follows: 0.25, 0.5 or 1.
7.3 TIME
( Only available in Sampler Mode )
Change the duration of your sample without changing the pitch, by applying a sophisticated timestretch algorithm. Choose a multiplication factor between 0.1 and 4 while 1 being the default duration or value.
7.4 RANDOMIZER
( description coming soon )
7.5 MIDI DUR
Sets the length of the MIDI output signal, the time which passes between the initial MIDI trigger and release events. Can be set to any value between 1/16th and 1 Bar, 2 Bars or 4 Bars.
7.6 SLIDER
( only in iPad Standalone app )
Here you can define, which effect from the selected Pad, should be controllable through the Slider control, see 9.10.
7.7 RESET
( not listed in iPad Standalone app )
Resets all patterns, Slices, Takes, effect settings, effect automations, and deletes the sample buffer of the selected Pad.
8.PLOT
When you tap on this element, the Sampler or Synthesizer view will open. When a sample is loaded, this plot illustrates the fade-in and fade-out regions, applied to the waveform. When Multi-Slice mode is selected, this plot will display the waveform with slices. When a synthesizer preset is loaded instead, this plot illustrates the Attack, Sustain and Release times of the oscillator.
9.CONTROLS
On the right side you have access to functions which are all related to the selected Pad:
9.1 KEYS (LV) / PLAY (FX)
When you press on KEYS in Live Mode, it will toggle the behaviour of all Pads to function as a Keyboard mapping for the selected Pad, so you can quickly and easily play melodies and trigger sounds with different pitch, using the chromatic scale. On the right side, the Takes and Groups fields will be temporarily replaced with one Octave Up and one Octave Down Buttons, giving you more control over your performance.
When you are in Effects Mode, the button will change to "PLAY" instead and act as a simple playback function for your sound.
9.2 STOP
( only on iPad Standalone )
Stops the Playback of the selected Pad.
9.3 SOLO
Temporarily mutes all other Pads and only plays back the pattern of the selected Pad. If SOLO is active and you select another Pad, it will set focus to that Pad instead.
9.4 RESET
( only in iPad Standalone )
Resets the selected Pad with all patterns, sample fade-in and fade-out regions, slices, effect settings and automations.
9.5 MUTE
Toggles the mute state of the selected Pad.
When muted, there is no futher playback and the transparency of the selected Pad will be reduced.
9.6 COPY / PASTE
Use this function to easily duplicate Pads.
When "COPY" is displayed, this button copies the sample / synthesizer preset, pattern, takes, fade-in & fade-out regions, slices, effect settings and automations of the current Pad into a buffer.
Once it displays "PASTE", taping the button will paste these attributes from the buffer into any selected Pad.
9.7 LOOP
Toggles the loop state of the selected Pad. Once activated, a red line will appear at the bottom of the selected Pad, showing the progress of the current bar in relation to the total bar length of that Pad. It basically tells you how much of the loop has already passed. Once a loop has finished its cycle, the mute state of the Pad will switch to the opposite of its current state. A great tool for toggling rhythm sections or different melodies on the fly, especially during live performance.
9.8 EDIT
Opens the EDITOR. Here you can add, duplicate and remove bars, change pitch for every individual step or fine-tune effect automizations.
9.10 SLIDER
( only in iPad Standalone )
Every pad lets you assign one of its effects to this control for quick and easy access.
Change the SLIDER setting inside the QUICK MENU ( 7.6 ) accordingly.
Once an Effect automation has been applied, a red lock icon will appear inside the control. In that case the SLIDER is deactivated as a control input. Only when REC is enabled, you will be able to overwrite the automation again.
9.11 REC / ARPEGGIATOR
9.11.1 REC
When you press this button, record will be enabled, so anytime you manually trigger a sound it will be added to the sequencer pattern. If Effects Mode is enabled, any vertical swipe gesture on a Pad will be recorded as effect automation.
When REC is active, two buttons inside the Status Bar ( 1 ) get temporarily replaced with UNDO and REDO buttons, enabling you to go back and forth through the history of all steps / notes which you have just added during record.
9.11.2 NOTE REPEAT / ARPEGGIATOR
There is a Note Repeat / Arpeggiator control at your disposal. It has four step intervals to choose from: 4th, 8th, 16th and 32nd.
When you press and hold one of these step intervals, the arpeggiator will be activated, triggering steps in that interval. You can slide horizontally to change the desired interval on the fly. When you release your finger, the arpeggiator will stop. Before release, you can also swipe up until the FIX label is highlighted. Then the arpeggiator will continue triggering at the chosen interval even after you release your finger, until the next time you press on the arpeggiator again.
There are three different arpeggiator modes which can be set inside the keyboard view:
1. Note Repeat NR ( Default )
When active, the arpeggiator will only trigger the steps in the selected step interval. It will not overwrite existing step pitch. This is great if you want to keep a melody while changing the rythm or timing of that pattern. During record, all steps inbetween the selected step interval will be erased.
2. Arpeggiator ARP
When active, the arpeggiator will only trigger the steps in the selected step interval. In this mode, the arpeggiator will overwrite existing pitch. Works with multiple notes. Plays one note after the another in the direction and with the amount of octaves, which have been set inside the keyboard view. During record, all steps inbetween the selected step interval will be erased. Arpeggiator is synced to timeline.
3. LIVE
This arpeggiator will only trigger when either a) finger is pressed on the note repeat / arpeggiator control or a note is pressed. It will overwrite pitch but also keep triggering existing steps inbetween the step interval. Arpeggiator is synced to the start time of activation.
Editor
Here you can add, duplicate and remove bars, change pitch for every individual step or fine-tune effect automizations.
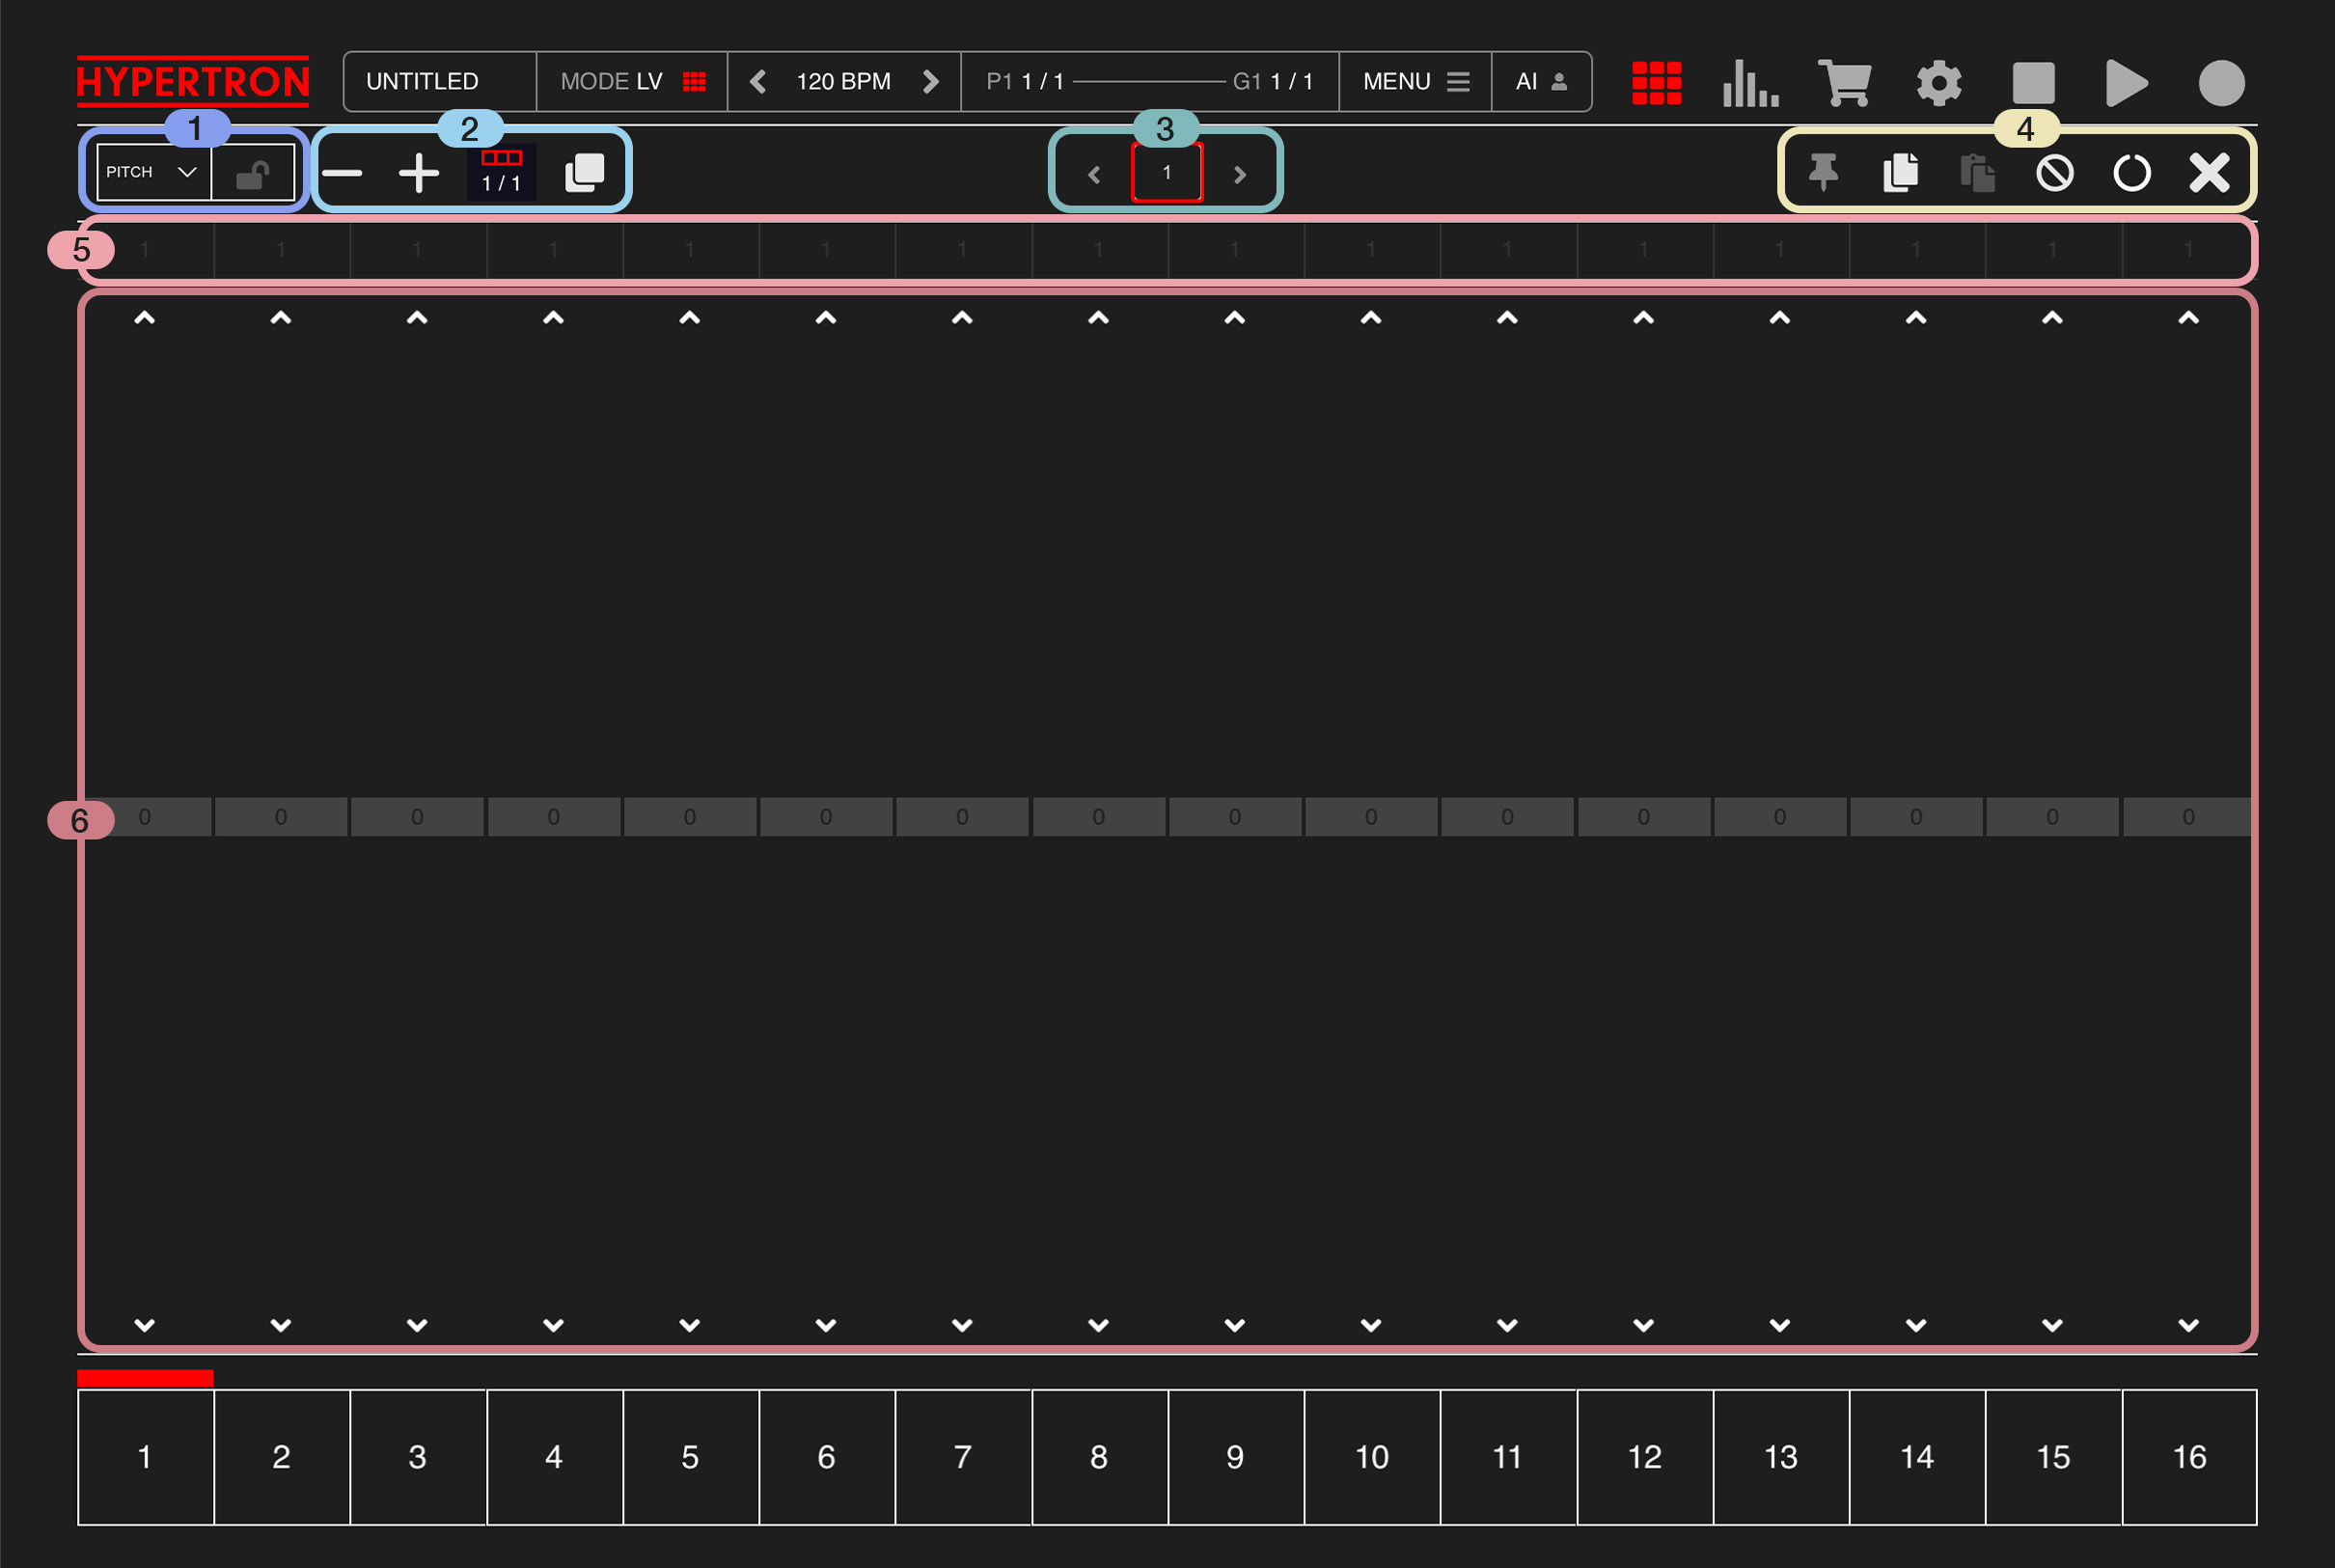
1.Dropdown Menu
On the left side you'll finde two buttons:
1.1. Editor View
Press the dropdown menu on the left to choose from a list of viewing options. The default view is "PITCH", which lets you adjust the sequencer steps, by turning individual steps on or off and adjusting their pitch value. Inside the list you will also find every effect of the selected Pad to choose from for editing effect automations.
1.2. Effect Automation Lock
The second button has a LOCK icon and signals if the current effect automation is active or not. You can also toggle the status on and off yourself. When the lock is closed, automation is applied to the current Pad ( it's active in all Takes in all Groups ) and swipe gestures won't work on these Pads in Effects Mode anymore. The only exception is when REC is active and a Pad is pressed, then it will overwrite the current automation and set the automation to active again.
2.Bar Length
One cool feature of Hypertron is that Pads can have individual bar lengths, so the kick drum could have one bar while the bass line has four. This makes Hypertron far more flexible than many other samplers. One bar consists of 16 steps, and a Pad can have up to 64 bars maximum.
Here are a number of controls that appear in multiple places in Hypertron and help you adjust the bar length of the current Pad, from left to right:
2.1 Remove Bar
Tap here to remove one bar from the total amount of bars of the selected Pad.
2.2 Add Bar
Tap here to add one, empty bar to the total amount of bars of the selected Pad.
2.3 Bar Info
This Element shows you the current bar and the total amount of bars of the selected Pad.
2.4 Duplicate Bars
Tap here to double the current amount of bars. When it has one bar, it will become two and if it has 4 bars, it will become 8 bars. The patterns of your bars get automatically duplicated as well, which makes it easy to create longer parts.
3.Bars
This element displays all bars and helps you navigate through them, starting with one bar. On an iPhone it can show up to 4 bars in a row and on an iPad it shows up to 8 bars. If the selected Pad has more bars than can be displayed, the arrows at the left and right help you scroll through all bars. You can also tap on a bar to jump to that bar, which makes it easy to access all steps inside that bar inside the Editor, even when the playhead is not there yet.
4.Tools
Here you'll find a bunch of useful tools, from left to right:
3.1 Sticky
Tap this PIN Icon to toggle between Sticky and non-sticky bar view. When activated, it will keep the current bar in view at all times. It will automatically be enabled once you alter a step or effect automation inside the editor view, making it easier to focus on the current bar.
3.2 Copy bar
Copies the pattern of the current bar into a buffer.
(On iPhone this button toggles between copy and paste functionality)
3.3 Paste bar
(Hidden on iPhones)
Paste the pattern from the buffer into the current bar.
3.4 Reset
Resets and erases the complete pattern of the selected Pad. The bar length will stay the same.
3.5 Loop
Tap this button to toggle a one-bar looping function on and off. When the looping function is on, it will keep repeating the current bar, meaning the bar that the playhead is currently running through. This might be helpful if you want to change one specific bar but need more run-throughs to get it right.
3.6 Close
Tap this button to close the Editor.
5.Slices
There are 16 dropdowns for assigning slice start points, one for each sequencer step. These slices must first be created in the Sampler using Multi-Slice mode before they appear in the dropdowns.
Here is an example of how to use it: Let’s say you have merged two samples into one using the Sample Editor, one closed and one open hi-hat sound. In Multi-Slice mode, you then split the sample into two slices and assign the open hi-hat slice to a step of your choice, allowing for more dynamics and variety.
Here is an example of how to use it: Let’s say you have merged two samples into one using the Sample Editor, one closed and one open hi-hat sound. In Multi-Slice mode, you then split the sample into two slices and assign the open hi-hat slice to a step of your choice, allowing for more dynamics and variety.
6.Editor View
When PITCH is selected in 1.1, you have 16 steps in the piano roll, which you can individually turn on and off. You can also press a step and slide up or down to change its pitch value. Alternatively, use the arrows at the top to raise the pitch by one semitone, or the arrows at the bottom to lower it by one semitone.
When you press a step and slide horizontally, the same pitch value will be applied to all other steps as well. This feature can be turned off by enabling MENU > SETTINGS > FREE PITCH DRAW.
When you press a step and slide horizontally, the same pitch value will be applied to all other steps as well. This feature can be turned off by enabling MENU > SETTINGS > FREE PITCH DRAW.